Window tutorial
This tutorial describes how to create and manage windows in NUI, covering the following subjects:
Overview
Main Window
Creating Additional Window
Deleting Window
Resizing Window
Moving Window
Showing & Hiding Window
Changing Window Stacking Order
Event Handling
Focus Management
Window overview
A window contains the visible content of the application.
When an application is created, it automatically creates the main window for building the main user interface of the application.
Additional windows can be created (as needed) to display additional content.
The window delivers various events (e.g. key event and touch event) to the application.
Creating main window
When an application is created, the main window will be automatically created:
MyApplication myApp = new MyApplication();
By default, the main window is created in full screen size, except that if running on the desktop the default size of the main window is set by the set-env script. The default main window size can be overriden by environment variables or command line options when launching the application in command line. For example:
DALI_WINDOW_WIDTH=1920 DALI_WINDOW_HEIGHT=1080 my-app
It also allows to specify the initial size and position of the main window by passing them to the constructor of the application:
public MyApplication(Size2D windowSize, Position2D windowPosition) : base(windowSize, windowPosition)
{
}

MyApplication myApp = new MyApplication(new Size2D(1920, 1080), new Position2D(0, 0));
The instance of the main window can be retrieved:
Window mainWindow = Window.Instance;
The window itself is just a blank container, and the views can be added to or removed from the window.
// Create a new view
View view = new View();

// Add the view to the window
mainWindow.Add(view);

// Remove the view from the window
mainWindow.Remove(view);
Below is a simple example of how to add content to the window:
// Get the window instance
Window window = Window.Instance;

// Change the background color
window.BackgroundColor = Color.White;

// Create a TextLabel
TextLabel title = new TextLabel("Hello World");

// Ensure it matches its parent's size (i.e. Window size)
title.Size2D = new Size2D(window.Size.Width, window.Size.Height);

// Align the text to the center of the TextLabel
title.HorizontalAlignment = HorizontalAlignment.Center;
title.VerticalAlignment = VerticalAlignment.Center;

// Add the text to the window
window.Add(title);
Creating additional window
It is easy to create an additional window in addition to the main window. The size and position of the new window should be specified. Each window can has its own background color and title.
Window newWindow = new Window(new Rectangle(0, 0, 1920, 1080))
{
    BackgroundColor = Color.White,
    Title = "new window"
};
Deleting window
A window can be deleted, which will also delete all the views inside the window. However, the main window cannot be deleted.
newWindow.Destroy();
Resizing window
The size of a window can be retrieved, and the window can be resized.
// Retrieve the current size of the window
Size2D windowSize = window.WindowSize;

// Resize the window by increasing its width
windowSize.Width += 100;
window.WindowSize = windowSize;
When the window size is changed, a resize event will be emitted.
Moving window
It is easy to retrieve the current position of a window and move the window to a new position.
// Retrieve the current position of the window
Position2D windowPosition = window.WindowPosition;

// Moving the window to the right
windowPosition.X += 100;
window.WindowPosition = windowPosition;
Showing and hiding window
Every window is shown after being created. It is possible to hide a window to make it invisible.
// Hide the window
window.Hide();

// Show the window
window.Show();
If all the windows are hidden, the updating and rendering of the windows will be paused.
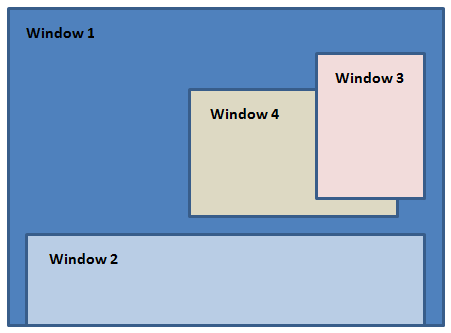
Changing window stacking order
NUI provides support for changing the stacking order of the windows.
A window can be raised to the top of the window stack so that no sibling window obscures it.
window.Raise();
A window can be lowered to the bottom of the window stack so that it does not obscure any sibling windows.
window.Lower();
New windows are automatically put to the top of the window stack at creation time by the window manager.
Event Handling
It is easy to handle various events emitted by the window.
Some useful events are introduced in this guide. Please check the Window API documentation for the full list of events.
Touch event
Touch event is emitted when the window is touched. If there are multiple touch points, then this will be emitted when the first touch occurs and then when the last finger is lifted.
Below is an example of how to handle the touch event:
window.TouchEvent += OnWindowTouched;

private void OnWindowTouched(object sender, Window.TouchEventArgs e)
{
    if (e.Touch.GetState(0) == PointStateType.Down)
    {
        // The window has been touched, do something
    }
}
Key event
Key event is emitted when the window receives a key event from the window manager.
Below is an example of how to handle the key event:
window.KeyEvent += OnWindowKeyEvent;

private void OnWindowKeyEvent(object sender, Window.KeyEventArgs e)
{
    if (e.Key.State == Key.StateType.Down)
    {
        if (e.Key.KeyPressedName == "Left")
        {
            // The left arrow key is pressed, do something
        }
        else if (e.Key.KeyPressedName == "Right")
        {
            // The right arrow key is pressed, do something
        }
    }
}
Resize event
Resize event is emitted when the window is resized.
Below is an example of how to handle the resize event:
window.Resized += OnWindowResized;

private void OnWindowResized(object sender, Window.ResizedEventArgs e)
{
    // Window is resized, do something
    Console.WriteLine("New width = " + e.WindowSize.Width);
    Console.WriteLine("New height = " + e.WindowSize.Height);
}
Focus management
Keyboard focus can be handled between multiple windows.
Here is a simple example to show how this can be done.
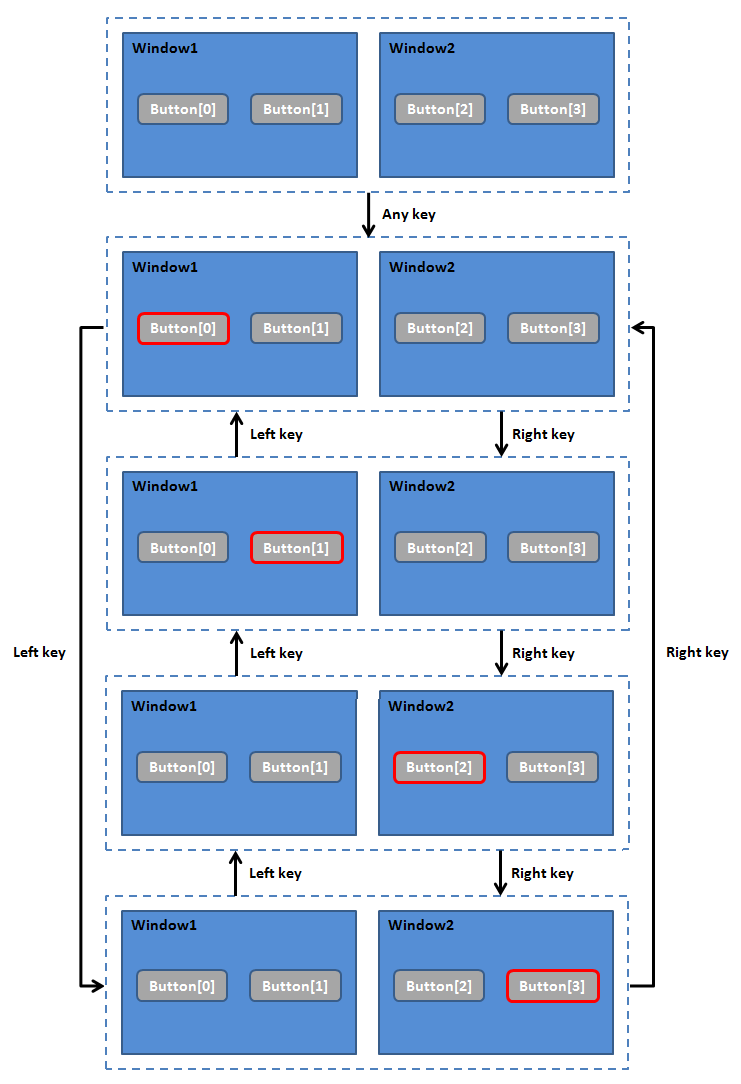
Suppose there are two windows and each window has two buttons (as shown in the diagram below). We want to move focus between the buttons in these two windows using “Left” and “Right” navigation keys.
Firstly, all the buttons should be set as focusable.
// In window1
button[0].Focusable = true;
button[1].Focusable = true;

// In window2
button[2].Focusable = true;
button[3].Focusable = true;
The focus manager will emit the following events that can be handled.
// Get the instance of focus manager
FocusManager focusManager = FocusManager.Instance;

focusManager.PreFocusChange += OnPreFocusChange;
focusManager.FocusChanged += OnFocusChanged;
focusManager.FocusedViewActivated += OnFocusedViewActivated;
Initially, there is no button focused (as shown in the above diagram).
When a navigation key (e.g. Left or Right) is pressed, focus manager will try to make the best guess of which view to get the focus in the given direction and move the focus automatically. A PreFocusChange event will be emitted before the focus is going to be changed, and the application can check which view the focus manager proposes to move the focus to and override it with a different view if it wishes.
In this example, focus manager doesn’t know how to move the focus, so the application should handle the PreFocusChange event to provide the logic of how to move the focus in different directions.
private View OnPreFocusChange(object sender, FocusManager.PreFocusChangeEventArgs e)
{
    // No button is focused initially, and focus manager doesn't propose which button should get the focus next.
    if (!e.ProposedView && !e.CurrentView)
    {
        // Move the focus to button[0]] in the first window
        e.ProposedView = button[0];
    }

    // There is already a button focused, and focus manager doesn't propose which button should get the focus next.
    // We decide which button should get the focus towards the given direction.
    if (e.CurrentView != null && !e.ProposedView)
    {
        // Suppose button[0].Name = "0", button[1].Name = "1", etc.
        // Check which button is currently focused
        int index = Int32.Parse(e.CurrentView.Name);

        // Moving towards left
        if (e.Direction == View.FocusDirection.Left)
        {
            index--;
        }

        // Moving towards right
        if (e.Direction == View.FocusDirection.Right)
        {
            index++;
        }

        // Loop the focus between the two windows
        if (index < 0) index = 3;
        if (index > 3) index = 0;

        // button[index] is the next button to get the focus
        e.ProposedView = button[index];
    }

    // Tell focus manager which button should get the focus next.
    return e.ProposedView;
}
Once the focus manager knows which view to get the focus, it will move the focus to that view. In the meantime, a FocusChanged event will be emitted after the current focused view has been changed. The application can handle this event if it wishes.
private void OnFocusChanged(object sender, FocusManager.FocusChangedEventArgs e )
{
    Console.WriteLine("Focus Changed");

    if (e.CurrentView)
    {
        // This is the view that was previously focused, do something
    }

    if (e.NextView)
    {
        // This is the view that is currently focused, do sometihng
    }
}
Once the focus is moved to a view, the view can be activated by pressing the “Enter” key. In this example, the current focused button can be activated as if the button has been touched. A FocusedViewActivated event will be emitted when the current focused view has the enter key pressed on it. The application can handle this event if it wishes.
private void OnFocusedViewActivated(object sender, FocusManager.FocusedViewActivatedEventArgs e )
{
    View activatedView = e.View;

    // activatedView is activated, do something
    Console.WriteLine("Button " + activatedView.Name + " is activated");
}